Connect NMEA 2000 to a Raspberry Pi
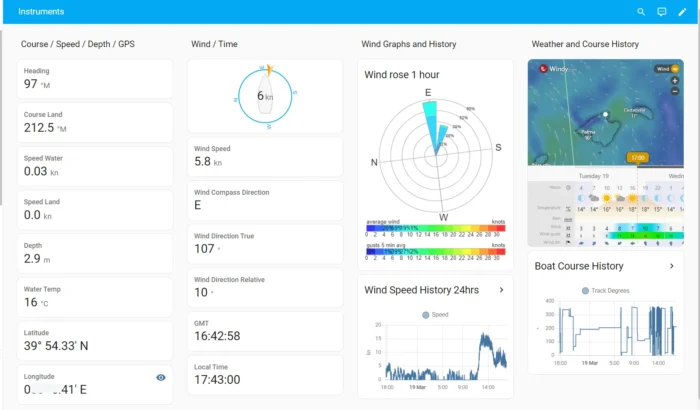
Connecting your boat’s NMEA 2000 (N2K) network to a Raspberry Pi is easier than you might think. With Home Assistant plus either a low-cost ESP32 CAN transceiver (wireless) or a USB-CAN adapter (wired), you can stream instrument data to custom dashboards, create smart alerts, and automate tasks — all locally and on a budget.
Whether you’re offshore or tied up in a marina, your N2K instruments (wind, depth, speed, heading, GPS, environmental params, and more) can be monitored, logged, and acted on from your phone or tablet.
An ESP32 with a small CAN transceiver reads the NMEA 2000 bus and publishes PGNs over Wi-Fi to Home Assistant — perfect when your backbone is a few meters from the Pi or you want a tidy install.
A Waveshare-style USB-CAN plugs into the Pi and an N2K drop cable for a robust hard-wired path.
Watch the full build and configuration for both wireless ESP32 and USB-CAN paths:
 NMEA 2000 to Home Assistant: ESP32 & USB-CAN (Complete Guide)
Why Connect NMEA 2000 to a Raspberry Pi?
A central marine computer consolidates navigation and boat systems into one interface. Benefits include:- Real-time alerts for wind, depth, temperature, voltages, and other limits
- Custom automations (e.g., anchor light at sunset only if stationary; voice callouts for wind shifts)
- Historical trend analysis for earlier fault detection
- Local, private, and cloud-free dashboards on tablet or phone

Two Connection Options (Choose One or Mix Both)
 Option A — Wireless via ESP32 + CAN Transceiver (Smart2000ESP)
An ESP32 with a small CAN transceiver reads the NMEA 2000 bus and publishes PGNs over Wi-Fi to Home Assistant — perfect when your backbone is a few meters from the Pi or you want a tidy install.
- ESP32 → CAN pins: TX =
GPIO18, RX =GPIO19 - Bus wiring: CAN-H (white), CAN-L (blue) to the transceiver
- Power: Fused 12 V → 5 V buck converter (USB OK for bench)
- Install: Add Smart2000ESP via HACS (menu-driven, no YAML)
- Tip: Add a Wi-Fi RSSI sensor card; N2K can be chatty and needs a good link
 Option B — Direct USB via USB-CAN Adapter (Smart2000USB)
A Waveshare-style USB-CAN plugs into the Pi and an N2K drop cable for a robust hard-wired path.
- Adapter config (one-time): Extended frame, 250 kbps (NMEA 2000 standard)
- Raspberry Pi device: Appears as
/dev/ttyUSB0(or 1/2) - Install: Add Smart2000USB via HACS, select the serial port, submit
NMEA 2000 Health Checks
- Proper termination: With power off, you should read ~60 Ω across CAN-H and CAN-L (two 120 Ω terminators in parallel).
- Supply voltage: With power on, the bus should show ~12–14 V at the drop.
- Typical colors: Blue = CAN-L, White = CAN-H, Red = +12 V, Black = GND, Shield = drain.
Install & Discover (HACS, No YAML)
- In HACS → Integrations, add the custom repository (see Code page).
- Download the integration and Restart Home Assistant.
- Add Integration → choose Smart2000ESP (ESP) or Smart2000USB (USB).
- ESP path: Enter the exact ESPHome device name and submit.
- USB path: Select
/dev/ttyUSB0(or the correct port), keep 2 Mbaud UART, submit.
Keep It Fast: PGN Include / Exclude
N2K networks can be busy. Use Include (whitelist) or Exclude (blacklist) to keep only the signals you need — wind, depth, GPS, heading, environmental parameters — for cleaner dashboards and better performance.Dashboards & Real Automations
- Dashboards: From the integration page, use Add to dashboard to seed cards quickly; refine later.
- Alerts: Depth below threshold → siren + push; wind limit for a set duration → voice callout; heading/wind shift → audible warning.
- Engine & power: Combine with oil pressure and temperature sensors for early warnings and trend analysis.
 Hardware Checklist
- Raspberry Pi 4/5 (4 GB+), A2 32 GB+ microSD, regulated 12 V → USB-C power
- Backbone: N2K trunk with two 120 Ω terminators and a drop to your adapter
- Option A: ESP32 + SN65HVD230-style CAN transceiver + fused 12 V → 5 V buck
- Option B: Waveshare-style USB-CAN adapter + N2K drop cable
- Nice to have: USB extension, multimeter (60 Ω / 12–14 V checks), heat-shrink and spare fuses
 Troubleshooting
- No entities? Ensure the backbone is powered during discovery.
- Wrong USB port? Re-plug and check All hardware for
/dev/ttyUSB…. - ESP drops? Reduce logger to error and ensure strong Wi-Fi RSSI.
- Odd values? Re-add after adjusting PGN filters; confirm units are normalized.
 Step-by-Step Video
Watch the full build and configuration for both wireless ESP32 and USB-CAN paths:
 NMEA 2000 to Home Assistant: ESP32 & USB-CAN (Complete Guide)
Resources & Related Guides
- Overview: Build a Central Marine Computer with Raspberry Pi
- NMEA 0183 (companion guide): Connect NMEA 0183 to a Raspberry Pi
Conclusion
With a Raspberry Pi and either an ESP32 or a USB-CAN adapter, you can bring NMEA 2000 directly into Home Assistant — fast, reliable, and expandable. Start with the instruments you need most, add alerts and automations, and grow from there. No subscriptions. No lock-in. Just clear data and practical safety.⚠️ Disclaimer
The information provided is for educational and informational purposes only. Perform all installations safely and correctly; consult a licensed professional for boat electrical work. Use at your own risk.
Tagged bilge alert system, boat alert system, boat automation, boat monitoring system, boat remote monitoring, central marine computer, DIY boat electronics, engine monitoring, ESP32 marine, Home Assistant marine, marine computer, marine instrumentation, NMEA 0183, NMEA 2000, open plotter, raspberry pi boat computer, signalk, smart boat sensors, solar monitoring boat, tank level monitoring, zigbee boat sensors
