Connecting your boat’s NMEA 0183 data to a Raspberry Pi is straightforward with Home Assistant and my menu-driven integrations. Choose TCP/Wi-Fi (no extra cables, works with Signal K or Wi-Fi gateways) or go USB Serial (RS232/RS422) for a robust wired feed. Either way, you’ll stream instrument data into custom dashboards, create alerts, and build automations — locally and on a budget.
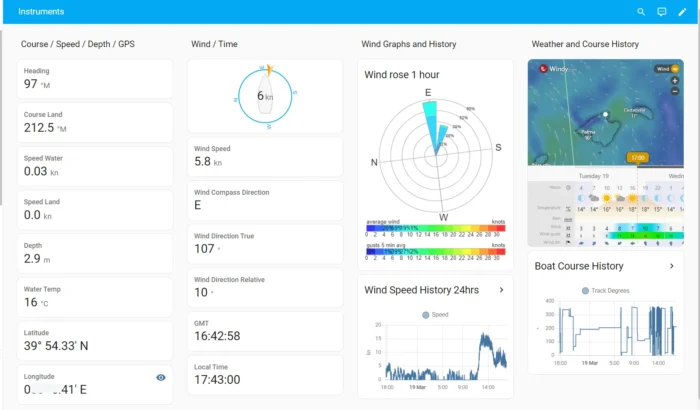
Whether you’re offshore or at the dock, your instruments (wind, depth, speed, heading, GPS, water temperature, and more) can be monitored, logged, and acted upon from your phone or tablet.
Ingest NMEA 0183 over the network with no extra cabling. Works with Signal K or any Wi-Fi NMEA 0183 gateway that streams TCP.
Use common USB-to-serial adapters for a reliable, hard-wired feed from your talker(s).
If you’re using Signal K as your data hub, enable its NMEA 0183 TCP stream so Home Assistant (Smart0183TCP) can subscribe.
Watch the full setup for both TCP/Wi-Fi and Serial paths:
 NMEA 0183 to Home Assistant: Wi-Fi (Signal K) & Serial (Complete Guide)
Why Connect NMEA 0183 to a Raspberry Pi?
A central marine computer consolidates navigation and boat systems into one interface. Benefits include:- Real-time alerts for wind, depth, temperature, voltages, and other limits
- Custom automations (e.g., reefing prompts, depth safety siren, voice callouts for wind shifts)
- Historical trend analysis to spot issues early
- Local, private, and cloud-free dashboards on tablet or phone
Two Connection Options (Choose One or Mix Both)
 Option A — TCP/Wi-Fi (Smart0183TCP)
Ingest NMEA 0183 over the network with no extra cabling. Works with Signal K or any Wi-Fi NMEA 0183 gateway that streams TCP.
- Setup: Add Smart0183TCP via HACS, restart HA, then enter device name, IP, and port (Signal K default
10110). - Great for: Avoiding long cable runs; using an existing Signal K server or wireless gateway.
- Tip: Keep the gateway and Pi on the same LAN/VLAN and allow TCP on port 10110.
Option B — USB Serial RS232/RS422 (Smart0183Serial)
Use common USB-to-serial adapters for a reliable, hard-wired feed from your talker(s).
- RS232 wiring: Talker TX → DB9 pin 2, GND → pin 5.
- RS422 wiring: TX+ → RX+, TX− → RX− on the USB-RS422 adapter (ground not required for listener).
- Detect the port: In HA → Settings → System → Hardware (look for
/dev/ttyUSB0or/dev/ttyUSB1). - Baud rates: 4800 (typical), 9600 (some instruments), 38400 for AIS.
- Install: Add Smart0183Serial via HACS, select the serial port and baud, submit.
 Configure Signal K NMEA 0183 TCP Output
If you’re using Signal K as your data hub, enable its NMEA 0183 TCP stream so Home Assistant (Smart0183TCP) can subscribe.
Quick setup in Signal K
- Open the Signal K web UI (for example:
http://raspberrypi.local:3000) and sign in as an admin. - Go to Server → Connections (or Settings → Connections, depending on your version).
- Add connection and configure:
- Direction: Output
- Protocol/Format: NMEA 0183
- Transport: TCP Server
- Port:
10110(Signal K’s common default) - Bind address:
0.0.0.0(listen on all interfaces), or your Pi’s LAN IP - Enabled: On
- (Optional) Limit which sentences are sent (e.g.,
MWV,HDM,GLL,VTG,DBT) to reduce noise. - Save and restart the Signal K server if prompted.
Point Home Assistant to Signal K
- In Home Assistant, install Smart0183TCP via HACS, then add the integration with:
- Device name: Any friendly name (e.g., SignalK-0183)
- IP address: Your Signal K server’s LAN IP
- Port:
10110
- Entities should start auto-discovering (grouped by function such as Global Positioning, Wind, Depth).
Troubleshooting
- No data appearing? Confirm the Signal K connection shows as Enabled and listening on
:10110. - Network blocks: Ensure your router/firewall allows TCP within your LAN on port
10110. - Too many sensors? In Signal K, restrict the sentence list; in Home Assistant, keep only the entities you need on dashboards.
Verify the Feed (Optional but Helpful)
- Use a lightweight serial monitor (e.g.,
minicom) to confirm readable sentences before configuring the integration. - If the text looks scrambled, the baud is mismatched — try 4800, 9600, or 38400.
- Split GPS and instruments across separate serial hubs for clarity and performance when needed.
Install & Discover (HACS, No YAML)
- In HACS → Integrations, add the custom repository (see your site’s Code page).
- Download the integration and Restart Home Assistant.
- Add Integration → choose Smart0183TCP (TCP) or Smart0183Serial (Serial).
- TCP path: Enter IP and port (10110 for Signal K), submit.
- Serial path: Select
/dev/ttyUSB0(or the correct port) and baud, submit.
Sentence → Sensor Examples
- HDM — Magnetic heading → heading (degrees)
- GLL / RMC / VTG — Position/COG/SOG → latitude, longitude, course over ground, speed over ground (knots)
- MWV — Wind angle & speed → angle (degrees) and speed (knots, m/s)
- DBT / DPT — Depth below transducer / depth + offset
- MTW — Water temperature (°C/°F)
Dashboards & Real Automations
- Dashboards: From the integration/device page, use Add to dashboard to seed gauges/cards quickly; refine later.
- Alerts: Depth below threshold → siren + push; wind limit for a set duration → text-to-speech callout; course/speed change → notification.
- Sailing logic: Reefing reminders from sailing angle + sustained wind speed; wind-shift guard for more than 30 s.
 Hardware Checklist
- Raspberry Pi 4/5 (4 GB+), A2 32 GB+ microSD, regulated 12 V → USB-C power
- Option A: Signal K server or Wi-Fi NMEA 0183 gateway streaming TCP (port 10110 default)
- Option B: USB-to-RS232 or USB-to-RS422 adapter and appropriate cabling
- Nice to have: Multimeter for power checks, spare DB9 shell, heat-shrink for clean installs
Troubleshooting
- No entities? Confirm the talker is outputting sentences; ensure TCP port 10110 is open or the serial port is correct.
- Wrong USB port? Re-plug and check All hardware for
/dev/ttyUSB…. - Unreadable characters? Change the serial baud rate (4800/9600/38400).
- Too many sensors? Start with the sentences you need; add others later.
 Step-by-Step Video
Watch the full setup for both TCP/Wi-Fi and Serial paths:
NMEA 0183 to Home Assistant: Wi-Fi (Signal K) & Serial (Complete Guide)
Resources & Related Guides
- Overview: Build a Central Marine Computer with Raspberry Pi
- NMEA 2000 (companion guide): Connect NMEA 2000 to a Raspberry Pi
Conclusion
With a Raspberry Pi and either TCP/Wi-Fi or USB Serial, you can bring NMEA 0183 directly into Home Assistant — fast, reliable, and expandable. Start with the instruments you need, add alerts and automations, and grow from there. No subscriptions. No lock-in. Just clear data and practical safety.⚠️ Disclaimer
The information provided is for educational and informational purposes only. Perform all installations safely and correctly; consult a licensed professional for boat electrical work. Use at your own risk.