Connecting your boat’s NMEA 2000 (N2K) network to a Raspberry Pi is easier than you might think. With Home Assistant plus either a low-cost ESP32 CAN transceiver (wireless) or a USB-CAN adapter (wired), you can stream instrument data to custom dashboards, create smart alerts, and automate tasks — all locally and on a budget.
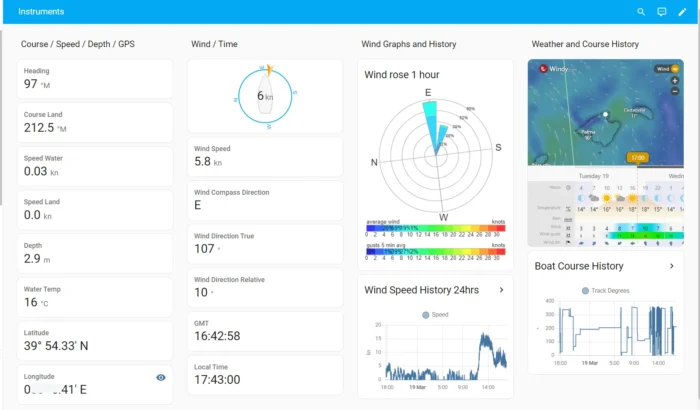
Whether you’re offshore or tied up in a marina, your N2K instruments (wind, depth, speed, heading, GPS, environmental params, and more) can be monitored, logged, and acted on from your phone or tablet.
An ESP32 with a small CAN transceiver reads the NMEA 2000 bus and publishes PGNs over Wi-Fi to Home Assistant — perfect when your backbone is a few meters from the Pi or you want a tidy install.
A Waveshare-style USB-CAN plugs into the Pi and an N2K drop cable for a robust hard-wired path.
Watch the full build and configuration for both wireless ESP32 and USB-CAN paths:
 NMEA 2000 to Home Assistant: ESP32 & USB-CAN (Complete Guide)
Why Connect NMEA 2000 to a Raspberry Pi?
A central marine computer consolidates navigation and boat systems into one interface. Benefits include:- Real-time alerts for wind, depth, temperature, voltages, and other limits
- Custom automations (e.g., anchor light at sunset only if stationary; voice callouts for wind shifts)
- Historical trend analysis for earlier fault detection
- Local, private, and cloud-free dashboards on tablet or phone
Two Connection Options (Choose One or Mix Both)
 Option A — Wireless via ESP32 + CAN Transceiver (Smart2000ESP)
An ESP32 with a small CAN transceiver reads the NMEA 2000 bus and publishes PGNs over Wi-Fi to Home Assistant — perfect when your backbone is a few meters from the Pi or you want a tidy install.
- ESP32 → CAN pins: TX =
GPIO18, RX =GPIO19 - Bus wiring: CAN-H (white), CAN-L (blue) to the transceiver
- Power: Fused 12 V → 5 V buck converter (USB OK for bench)
- Install: Add Smart2000ESP via HACS (menu-driven, no YAML)
- Tip: Add a Wi-Fi RSSI sensor card; N2K can be chatty and needs a good link
Option B — Direct USB via USB-CAN Adapter (Smart2000USB)
A Waveshare-style USB-CAN plugs into the Pi and an N2K drop cable for a robust hard-wired path.
- Adapter config (one-time): Extended frame, 250 kbps (NMEA 2000 standard)
- Raspberry Pi device: Appears as
/dev/ttyUSB0(or 1/2) - Install: Add Smart2000USB via HACS, select the serial port, submit
NMEA 2000 Health Checks
- Proper termination: With power off, you should read ~60 Ω across CAN-H and CAN-L (two 120 Ω terminators in parallel).
- Supply voltage: With power on, the bus should show ~12–14 V at the drop.
- Typical colors: Blue = CAN-L, White = CAN-H, Red = +12 V, Black = GND, Shield = drain.
Install & Discover (HACS, No YAML)
- In HACS → Integrations, add the custom repository (see Code page).
- Download the integration and Restart Home Assistant.
- Add Integration → choose Smart2000ESP (ESP) or Smart2000USB (USB).
- ESP path: Enter the exact ESPHome device name and submit.
- USB path: Select
/dev/ttyUSB0(or the correct port), keep 2 Mbaud UART, submit.
Keep It Fast: PGN Include / Exclude
N2K networks can be busy. Use Include (whitelist) or Exclude (blacklist) to keep only the signals you need — wind, depth, GPS, heading, environmental parameters — for cleaner dashboards and better performance.Dashboards & Real Automations
- Dashboards: From the integration page, use Add to dashboard to seed cards quickly; refine later.
- Alerts: Depth below threshold → siren + push; wind limit for a set duration → voice callout; heading/wind shift → audible warning.
- Engine & power: Combine with oil pressure and temperature sensors for early warnings and trend analysis.
 Hardware Checklist
- Raspberry Pi 4/5 (4 GB+), A2 32 GB+ microSD, regulated 12 V → USB-C power
- Backbone: N2K trunk with two 120 Ω terminators and a drop to your adapter
- Option A: ESP32 + SN65HVD230-style CAN transceiver + fused 12 V → 5 V buck
- Option B: Waveshare-style USB-CAN adapter + N2K drop cable
- Nice to have: USB extension, multimeter (60 Ω / 12–14 V checks), heat-shrink and spare fuses
 Troubleshooting
- No entities? Ensure the backbone is powered during discovery.
- Wrong USB port? Re-plug and check All hardware for
/dev/ttyUSB…. - ESP drops? Reduce logger to error and ensure strong Wi-Fi RSSI.
- Odd values? Re-add after adjusting PGN filters; confirm units are normalized.
 Step-by-Step Video
Watch the full build and configuration for both wireless ESP32 and USB-CAN paths:
NMEA 2000 to Home Assistant: ESP32 & USB-CAN (Complete Guide)
Resources & Related Guides
- Overview: Build a Central Marine Computer with Raspberry Pi
- NMEA 0183 (companion guide): Connect NMEA 0183 to a Raspberry Pi
Conclusion
With a Raspberry Pi and either an ESP32 or a USB-CAN adapter, you can bring NMEA 2000 directly into Home Assistant — fast, reliable, and expandable. Start with the instruments you need most, add alerts and automations, and grow from there. No subscriptions. No lock-in. Just clear data and practical safety.⚠️ Disclaimer
The information provided is for educational and informational purposes only. Perform all installations safely and correctly; consult a licensed professional for boat electrical work. Use at your own risk.